
Aghanim’s labyrinth
Aghanim’s Labyrinth is the long-awaited summer event that has finally come and players of all skill levels are overjoyed with its challenging but rewarding gameplay. The possibility of winning one of the exclusive rewards during the Aghanim’s trials event is also part of the interest as many players are returning for this PvE event.
But what is the event, how do you play it, and what lucrative rewards can you earn? All of this will be answered in today’s overview of Valve’s new summer event.
The Labyrinth
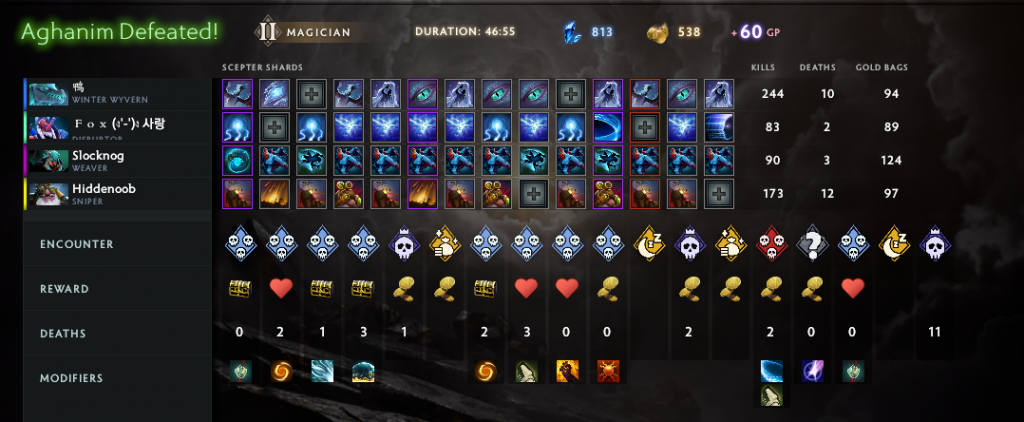
Aghanim’s labyrinth itself is made up of 18 rooms housing different monsters, traps, and fun past times alike. Players are almost always given a choice between 2 rooms for either gold, treasure, or extra lives. The only way to progress through rooms is by killing all units inside it and beware, there will be many foes blocking your progress.
Enemies always contain a combination of regular mobs and “captain” units which are beefier and hold special abilities. These special abilities depend on the room’s current modifier, aka. “room modifiers.”
Rooms 6 and 13 will always be Bonus rooms offering free gold by way of fun mini-games. While Rooms 5 and 12 are Boss rooms., 11 and 17 are rest rooms offering both types of vendors. The 2nd vendor offers unique items for sale, as well as extra lives for 1000 gold. These unique items are permanent buffs to stats, as well as one-time-use vials of Echo slam, Ravage, and Dragon form spells.
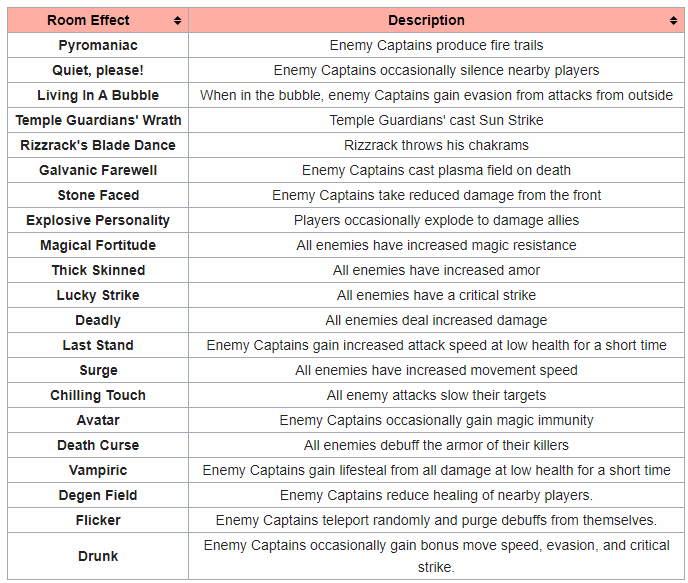
It’s extremely important to take into account your combination of heroes when picking rooms, as modifiers such as “Avatar” can completely decimate caster heroes.
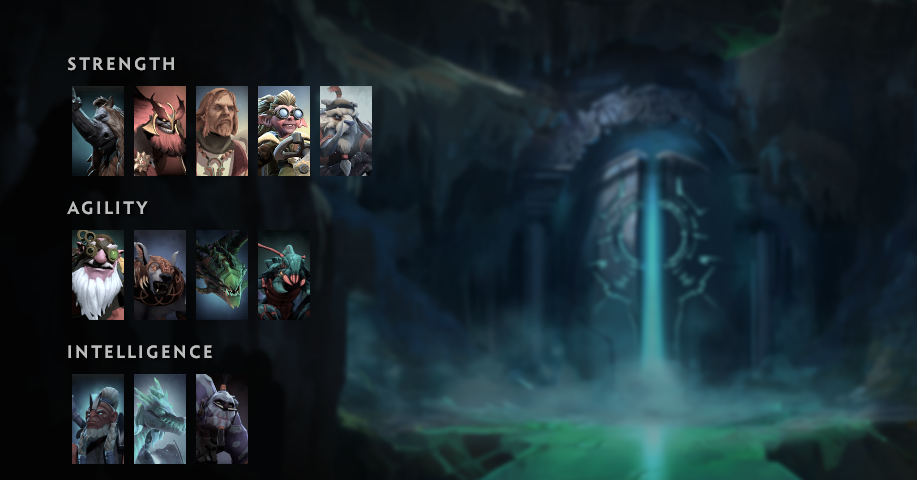
Available heroes
You are only able to choose from a small pool of heroes, but they will get the job done. Each hero gains a new modifier for their spells after each round. Thus, Ursa can turn into a team buffer or tank, while Winter Wyvern can become a DPS machine.
Some heroes have had their abilities changed from normal DOTA 2 to be balanced in this mode. For example, Ursa’s Fury swipes only stack up to 5 times. This can be changed by picking up Aghanim’s shards throughout your dungeon run. Aghanim’s shards are special modifiers to your hero that either empower your current stats and abilities or give you completely new abilities. For example, Omniknight gains a 1 person Guardian angel spell, while Magnus gets a “Reverse Reverse Polarity” which flings units away, similar to KOTL’s Blinding light. Why it wasn’t just named “Polarity” is beyond me though.
Blessings
Blessings are permanent buffs that can be purchased in the battle pass using ![]() Arcane Fragments. These are gained by progressing through Aghanim’s labyrinth. The first 1,800 Fragments earned each week are tripled in value, resulting in a total of 5,400 Fragments.
Arcane Fragments. These are gained by progressing through Aghanim’s labyrinth. The first 1,800 Fragments earned each week are tripled in value, resulting in a total of 5,400 Fragments.
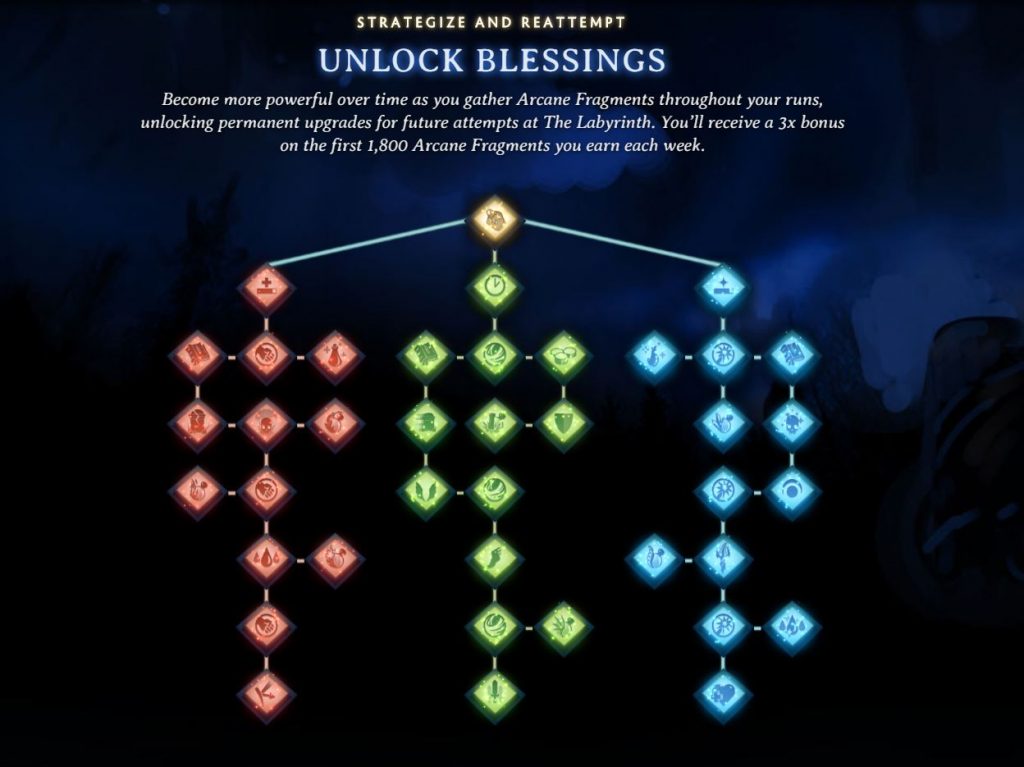
When choosing blessings, it’s important to decide ahead of time what role you want to fulfill. Some are more useful than others. For example, The Thorny Hide (Returns damage to attackers) blessing is amazing for Ursa and Mars, but completely useless for sniper and such. On the other hand, Miracle of Life (+1 life at the start) is very good for all heroes. The only issue with it is it’s in the int tree making it hard to get for str and agi heroes.
My recommendation would be to completely unlock the first 3 tiers, as they give all-around good power-ups for their relatively low cost. Especially the bonuses to health and mana restoration via pickups found inside dungeons. Details about each particular blessing can be found on the wiki page here.
Rewards
Rewards for beating Aghanim’s labyrinth are a selection of chat wheel voice lines, as well as an emoticon. Dota+ subscribers can use the emoticon to further enhance their usual chat wheel lines.
- Friends, let us skirmish!
- I admit nothing but my sadness that you’re gone.
- Now for the ol’ razzle-dazzle
- BOCK BOCK BOCK! That is what you sound like!
Players who own the Battle Pass can earn up to 2,000 Battle Points per week. This limit is raised to 3,000 at Battle Pass 150, and 4,000 at Battle Pass 250.
Aghanim’s trials
Those that have proven themselves in Aghanim’s labyrinth can also compete against other players. Similar to other Valve events such as Siltbreaker and Diretide, Valve has implemented a leaderboard where players can see each other’s times. The fastest to clear a randomly generated dungeon each week will be eligible to receive prizes. These prizes are probably going to fetch ludicrous prices on the steam market, as they are very limited in stock. There are four ascension levels with the following rewards:
-
- 1: Aghanim’s Interdimensional Baby Roshan
- 2: Waterlogged Kunkka Shoes
- 3: Random Arcana
- 4: A weekly in-game Aghanim’s effect for defeating the first boss

Strategy guide
While adventuring through Aghanim’s Labyrinth you are going to face many foes and traps. Thus, you must prepare yourself to what is to come. Team compositions should generally have some sort of tank and healer unless you want to spend all your time kiting enemies around. Similar to our previous rundown of positions in DOTA 2, which you can read more about here, Aghanim’s Labyrinth also has its own rules. Thus, the traditional 1 tank, 1 healer, 2 DPS composition will get you pretty far through Aghanim’s labyrinth.
Tank heroes: Ursa, Mars
Mars will do a wondrous job of tanking, but do be careful to not turn your back on the enemy. In my runs of Mars I rarely died (when paired with a healer). Usually going for items such as Satanic, Assault Cuirass and a Heart of Tarasque will do the trick. His high HP pool will make % heals such as Wyvern’s extremely powerful so look out for that combo.
Ursa can sustain for most of the run with any source of lifesteal, when paired with a healer. With modifiers that grant high evasion on each cast of Overpower Ursa will survive physical rounds. Damage resistance as well as magic immunity on Enrage will make sure everyone survives boss rounds with lots of spells flying about.
DPS heroes: Sniper, Winter Wyvern
They both function in the same role with similar item choices. Going for Maelstrom (Mjolnir) and MKB, and ending it with Bloodthorn will make sure you never run out of damage. Good item progressions would be:
- Sniper: Power Treads – Maelstrom(Mjolnir) – Mask of madness (Satanic) – Yasha(S&Y) – MKB – Daedalus.
- Wyvern: Power Treads – Maelstrom(Mjolnir) – Yasha (Y&K) – MKB
Hurricane pike can also be extremely good as mobility is needed for the last round versus Aghanim.
Support heroes: Disruptor, Wyvern, Omniknight, Weaver
Healers
Omniknight can cast a single target Guardian Angel and give free pathing (flying movement) to allies affected by GA. With the proper shards, Purification becomes an AOE heal ability. Heavenly grace will also cast Purification on the unit, as well as provide insane amounts of damage reduction. His Degen aura can boost your ally’s movement speed by 44% (everyone is basically hasted).
With the right shards I had around 6s cooldown on Heavenly grace, and its duration was 15seconds so I could permanently keep it up on 3 people.
Wyvern has plenty of shards for increasing Cold Embrace’s effectiveness. Increasing the % heal, as well as making the unit immune to damage as well as dealing AOE damage after it’s duration.
Buffers
Disruptor has to be my favorite in this mode. If lucky to get the right shards, you become the single best support of the lot. Reduced cooldown on kinetic field will ensure you are able to kite any and all foes. Double Kinetic field increases your effective AOE as well as synergizes well with your healing. Kinetic field can heal 4% of max HP per second, up to 8% when inside of 2 Kinetic fields simultaneously. There is also a +60 attack speed buff to allies inside the ring.
Weaver has some of the most surprising shards out of all the heroes in my opinion. The Swarm can be cast onto allies and will heal them as well as increase their armor. Shukuchi also applies bugs to anyone he passes through. In combination with being able to cast Time Lapse on allies, they are going to sustain through an awful lot of damage.
For item builds I’d suggest the following:
- Disruptor: Guardian Grieves, Octarine core, Kaya&Yasha, Boots of Travel 2
- Omniknight: Guardian Grieves, Octarine core, Vladimir’s offering, Force staff
- Winter Wyvern: Guardian Grieves, Solar Crest, Force staff
- Weaver: Solar Crest, Octarine core and Assault Cuirass + Desolator for mass –armor
Boss guides
Rizzrick the Razorsaw
Do not be fooled into thinking it was just a fight versus Timbersaw. He will spawn a Treant for every tree destroyed. These Treants do not pose a threat by themselves but can easily run you over by sheer numbers.
Rizzrick casts Timber chain, and all units hit take damage and are stunned as well.
Before using Whirling death (which can 1-shot people) he will give off an alarm (red circle will appear beneath him).
After you have taken more than half his health, he will start shooting off multiple Chakrams at once. This can easily wipe your entire team. Ideally, you will want to cancel it by using spells such as Reverse Polarity or Winter’s curse.
In case your team lacks AOE spells to deal with Treants, it’s possible to guide Rizzrick to the southeast corner of the map, where fewer trees are located.
The Malorkian Hammers
It’s a fight against 2 giant Omniknight’s, thus beware their AOE heals. They will occasionally toss their hammers which will inflict about half your health in damage and stun you for a bit.
The best way to defeat them is to separate them in either a 3v1 scenario or in 2v2. After defeating one the other will enter a phase where he is invulnerable and casts Pugna’s Nether blasts all around the map. Each time he starts casting the blasts they grow bigger thus it’s advisable to defeat the 2nd boss as quickly as possible.
The easiest way I’ve found to deal with them is to bring them both down to low health (~5%) and then finish them off in quick succession. The Nether blast spam can get out of hand quickly and cost you precious lives.
The Purple Shadow
A fight against Void spirit on steroids. He will use all of his usual abilities, but beware that he can easily deal 80% of your health. Dissimilate will apply a stun on whomever it hits. All his spells can be easily dodged as he will either face the direction, give off an alarm (Red circle), or other (Dissimilate location will glow). After you have taken more than half his health, Earth spirit remnants around the arena will start kicking rocks. This will last for about 10 seconds after which you can finish Void spirit off.
This fight should not provide much trouble for you. All of the attacks are telegraphed. To avoid the Earth spirit’s kicks one can simply hide behind one of the Earth spirits as they won’t kick behind themselves. A good hiding spot I’ve found is below the southern stairs where you walk up to meet Void spirit.
Storegga the Ample
She has several 1-shot attacks therefore it’s extremely important to stay mobile and aware. She will occasionally pick up rocks around the map and toss them onto players. If there are players near her though, she will pick them up and toss them instead. She will also let out a roar that casts avalanches from her position towards the ends of the arena.
Your safest bet will be to run in a circular motion around the arena to dodge avalanches. They can be blocked by using rocks around the arena, but it’s buggy as to when it works. Ranged DPS such as Sniper and Winter Wyvern are extremely good in this round, but they need to stay mobile.
Small Tiny’s will also be summoned in swarms and deal a lot of damage (250 per hit) so keeping count of them is advised as you can easily get run over otherwise.
There is currently a bug where Storegga can pick up one of your allies, and if no one else is alive, she will not toss him. Abandoning the game is thus needed (or waiting for the game to crash from constant unit spawns).
The Apex Mage
The ultimate fight against Aghanim himself…at least one version. You will need to beat him at least 4 times to unlock all voice lines. While his kit and behavior don’t change between difficulties, he does gain more health and more damage.
For this battle what you need is plenty of damage and mobility. Unless you have ~450ms I’d suggest a last-minute force staff.
Aghanim has a couple of spells at his disposal. The most annoying is a beam he channels after you which you cannot outrun without high movement speed or a force staff. Heroes like Winter Wyvern can block the damage using Cold embrace with magic immunity shard. The same goes for Omniknight’s Guardian Angel with magic immunity selected.
Aghanim will also periodically throw around Spears that work similarly to Mars’s Spear of Mars. The notable difference being they fly infinitely until they hit a tree or the wall.
He will also send out small blue balls in true bullet hell fashion that change velocities, thus making them harder to dodge.
Aghanim’s ultimate move is to lock an ability from each hero after a short channel time. He will then spawn crystals (1 for each hero) that need to be broken in order to unlock that ability. Quickly unlocking these abilities is paramount, otherwise, you risk losing key abilities such as Ursa’s enrage.
Tips for other rooms
Al, the chemist – silence him before he stuns. Disruptor can block his movement. Wyvern and Omniknight can nullify his high DPS.
The beasty babies – kill the small ones first as they buff the bigger ogres
Splitsvile – Brewmaster will split at 25% health. Nuke him down with a spell to avoid this.
No time to brood – Spiders will Lassoo you and drag you towards other spiders. Destroy their sacks and disable them from moving (glimpse, kinetic field, stuns)
Carty’s revenge – Destroy the catapults first. The golems have blademail so it’s important to kite out their duration.
Angry stuff with wings – Wildwings will cast tornados in front of them, so stay behind them or dodge if at range.
An unwinnable standoff – Skywrath is very weak and can easily be picked off. Legion commander will cast duel, so either control her using spells or burst her down together.
Arrows of the moon – Mirana is weak but casts global Sacred Arrows. Luna’s can easily rush you down with high DPS and glaives.
The soothing sounds of Sirens – Avoid this if possible. Siren’s deal a combination of high physical and magical damage. Do not attempt if modifier “Pyromaniac” is on, especially with melee heroes…I found this out the hard way. For all those brave enough to try, Wyvern can instantly kill the big siren with her ult. Kite, but beware the sirens have Radiance.
My rock collection – Ogre’s split into smaller and smaller ones, but they all deal high physical DPS. Kill one Ogre’s spawns before attempting a 2nd ogre. Kite other Ogres to the side if need be. Ogres are very slow and can be easily kited if need be.
They speak in spectral tongues – Avoid hitting Spectre when her blademail is up. Turn off radiance if you have it (same for Witch doctor heal/Omniknight aura if appropriate shards are taken).
Conclusion
Now that you know what awaits you, go and be brave! Grab a couple of friends and have fun in this year’s summer event. Aghanim’s Labyrinth holds many secrets for you to discover. Enjoy the amazing voice lines that reveal much about the character of Aghanim. Don’t be afraid of taking the more difficult challenges as they are just part of the fun. And don’t forget to stay tuned for more regular DOTA 2 updates here at z3ddota.com