Aghanim’s labyrinth traps guide.
If you are struggling with Aghanim’s labyrinth traps, do not fret as the guide that you have been waiting for has finally come. You are about to learn how to beat every labyrinth trap room without breaking a sweat. Be it for faster runs in Aghanim’s trials or just preserving lives when playing for fun, we got your covered. To learn more about what Aghanim’s labyrinth is, check out our guide explaining what it is and how to play it.
After the Aghanim’s labyrinth update on the 18th of July, trap rooms now give elite shards making them a worthwhile alternative. For those unaware, elite shards have double the effect of common shards. Thus, you can easily gain lots of damage, movement speed, or incredible spell upgrades, among others.
Important to state at the start of this guide, all chests and prizes inside the trap room can be picked up after finishing it. Thus, you shouldn’t get distracted and should focus on simply finishing the run. If you are on your last life, you can commit suicide by trap and will resurrect if at least 1 of your teammates finishes it.
Without further ado, let’s get down to explaining and guiding you through each and every trap level.
The Cliffs of Sacrifice
One of the first trap rooms you can find, usually in the 3 to 4 depth. The trap room The Hallway of Pain is also at this depth, but both are beginner-friendly and can easily be beaten without losing too much time or lives.
This room consists only of fire breathing statues and 2 arrow shooter. The fire shooters have a very simple shooting pattern. Take your time to learn the pattern. After a couple of runs you’ll instinctively know how to pass each one.
The shooting pattern is one of the following:
- 3 quick fire breaths
- 1 fire breath
- 1 fire breath, then 3 quick fire breaths
When faced with 2 statues at the same time you can wait for them to sync up their patterns. If you are going for a fast trials run, it’s important to keep check of statues you are coming up to. Make sure never to run into a 3 quick fire breath situation, as you will get hit at least 2 times while passing through.
The flame breathing statues with a paved way in front of them will activate when stepped on. They will usually not hit you if you are just passing through. Beware of players in front of you, as they can activate it.
The arrow shooters are placed near the bridges. The 1st arrow shooter will never hit you but can hit a fellow player behind you. Thus, make sure to ping (ctrl+alt) them to stop if they aren’t paying attention. Arrows deal more damage than fire traps. The 2nd arrow shooter can hit you, but simply moving a bit north will usually get you out of harm’s way. It can hit people behind you, so do be careful, especially if you are the one behind.
The Hallways of Pain
The labyrinth traps start out simple and easy. This trap room comes at the 3-4 depth, just like The Cliffs of Sacrifice. As this one is beginner-friendly as well, there aren’t any difficult passages.

The only tricky passage is at the end. To pass it, you only need to avoid all the buttons. If you are playing with all visual settings enabled, I’d recommend you pause the game at this point. Go to settings and disable the “Grass” effect. With grass enabled it’s very difficult to see the buttons.
This room usually contains 2 treasures, so keep your eye out for those as they can contain treasures and lives as well.
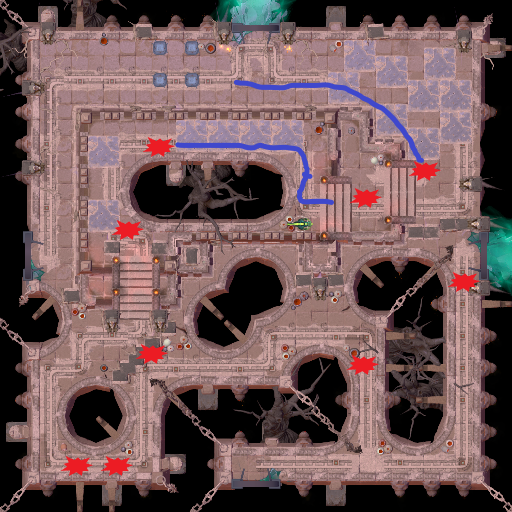
The Long and Winding path
Here the difficulty curve goes up. There are plenty of traps to get stuck on. Just like the traps before though, this one only has fire and arrows to be careful of. Green arrows on the minimap represent the arrow shooters. They can kill you in 2 shots so be careful. The optimal route for some of the tricky places has been marked in blue.
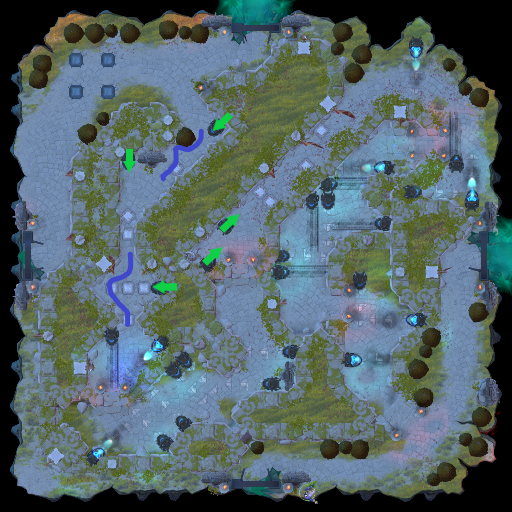
There is 1 treasure hidden, but it’s behind a fire-spitting statue and can easily be gotten after you’ve beaten the room. Even in trials, I’d advise against going for it as it can delay your time considerably if you get unlucky with the pattern.
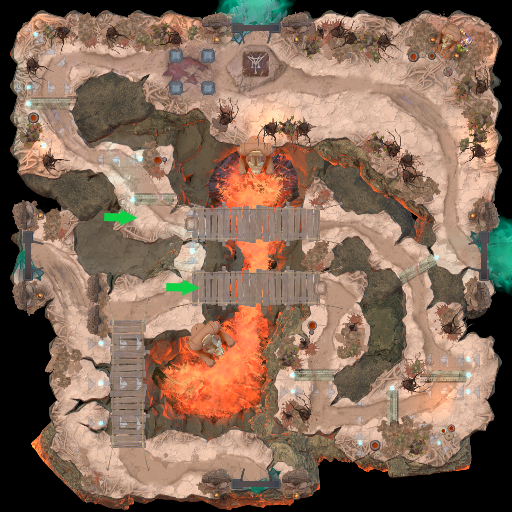
A Pleasant and Peaceful Garden
This level is quite simple if you know which buttons not to step on. There are quite a few narrow places though so you need to maintain speed.
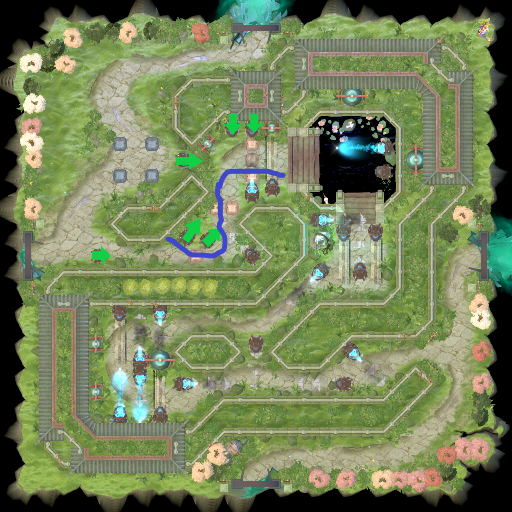
When prompted between 3 buttons, go for the bottom one. The top one activates the top arrow shooter which will instantly hit you. The middle one prompts the western one, which can be hard to dodge. Take the left button next and run down. The next arrow shooter will miss if you just run a bit north and wait for the arrow to fly by.
Splitting hair
The labyrinth traps come in all shapes and sizes. At this level, we finally get scythes, which can easily cut you down with no trouble. It’s very important to keep track of their movement. Sometimes you can luck out by running out of their reach at the end, but it’s better to be alert at all times.
You want to stop at places marked with a red star. Avoid the scythes flying around. They can kill you in 2 hits. You generally want to go when they have passed you, and are going in the direction from which you come from. This should give you the most time possible as you will be running away from it.
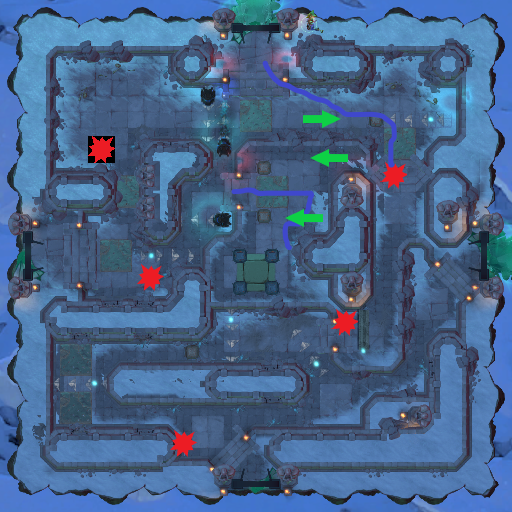
Corridor of Chaos
Probably the most fun trap challenge to do. Scythes are flying from all sides, and there are spike traps that stun you as well. Once you start running you cannot stop. There are a few spots where the blades don’t go. Red stars on the map mark places where you want to stop. While it may seem daunting it’s actually quite easy to do. All you require is a bit of patience and precise clicks. The last part is extremely scary, but you just need to wait for the blades to pass by you.